Building a Hub and Spoke VPN with WireGuard
“If you don’t use a s2s tunnel between on-prem and cloud, are you really a netsec engineer?”
- CommanderKronos
1. Table of Contents⌗
- Table of Contents
- Introduction
- VPN intro for dummies
- What is a VPN?
- How does a Hub-and-Spoke VPN work?
- Tech Stack
- Network Design
- Configuring WireGuard tunnels and routing
- AllowedIPs in WireGuard
- Configuring domain records in Route 53 for Geolocation Routing
- Creating a VPC Peering Connection
- Configuring the Proxy
- Conclusion
- Glossary
- Document History
- Sources
- Special thanks
2. Introduction⌗
My father has a company, which has a small datacenter
In this datacenter there is a vSphere HCI Cluster
For a long time we were using a jumphost to control machines in this vSphere environment, since my Dad is not focused on networking
I dislike this. TeamViewer is okay if you quickly need to help your grandma, but not as a permanent solution
Therefore I decided that we are going to build a VPN and connect directly with the network of our datacenter instead
This has several advantages:
- Speed
- No need to use RDP nested inside of a TeamViewer session
- Ability to route over AWS infrastructure through use of AWS VPC-Peering
- Flexibility
- Able to integrate cloud infrastructure with datacenter infrastructure
- Communication over any protocol, instead of just a Remote Desktop connection
- Security
- Send traffic to and from cloud resources over encrypted tunnel i.e. Syslog or Netflow to SIEM
The idea quickly became reality and now I’m routing between several sites all around the globe with my own little AWS instance

During this article I will elaborate on my journey how I got this Hub-and-spoke VPN running
Specifically I will explain my design choices and technical implementation of the following:
- Network design
- WireGuard VPN configuration
- Geolocation routing with AWS Route 53
- Proxying VPN connection over VPC Peering connection
3. VPN intro for dummies⌗
Before I go into further detail on my specific setup, I want to provide an explanation of some VPN concepts, for readers that might not be familiar
Using a VPN doesn’t mean, that I installed NordVPN and selected a country
This extremely popular usecase of VPNs is technically just a very small niche in a broad spectrum of possibilities
The specific type of VPN that is used with Service Providers like NordVPN is a full-tunnel Client-to-Site VPN
That means I am tunneling all my traffic destined for the internet to the VPN Server hosted by NordVPN
The VPN Server will then forward the traffic to the internet for me, which is why the receiver of this traffic will see that the traffic is originating from a public IP which is owned by NordVPN
This is a basic concept that is used by all VPN Service Providers like MullvadVPN, ProtonVPN, NordVPN, AirVPN, ExpressVPN, CyberGhost VPN and more
But there is much more!
Here is a list possible VPN scenarios:
| Operation mode | Description |
|---|---|
| full-tunnel | ALL traffic that your client generates will be sent over the tunnel |
| split-tunnel | Choose the networks you want to access through the VPN. Will selectively route traffic with matching destination IP addresses over the tunnel |
| Configuration | Abbreviation | Description |
|---|---|---|
| Client-to-Client | C2C | One client connects to one client, without any of both forwarding traffic, while forming a virtual network |
| Client-to-Site | C2S | The Site will forward traffic to other clients on its network |
| Site-to-Site | S2S | Both networks “merge” with each other into one large network, because both have forwarding active |
| Site-to-Multisite | S2MS | A Site connects to a VPN Server which forwards the traffic to several other Sites in a large network \ |
4. What is a VPN?⌗
A VPN, in its original form, is a concept to create a virtual network, over a less secure network
This less secure network is often the internet. We don’t trust people there!
We use VPN protocols to encapsulate the original IP packet inside of another IP packet, which is meant for the VPN Server. This is known as tunneling
VPNs don’t need to be complicated
VPN is just an abstraction, of what happens internally
After the tunneling happened, we know that we end up with another network interface, which is a virtual interface that lets us access this virtual private network
You have to understand the different types, operation modes and what makes them unique, but you don’t necessarily have to know how IPsec/WireGuard/SSL works internally
5. How does a Hub-and-Spoke VPN work?⌗
I think that building a Hub-and-spoke VPN makes you understand, how a VPN protocol really works
A Hub-and-Spoke VPN is a VPN topology, where a single device (Hub) acts as a router between multiple devices (Spokes) that connect to it
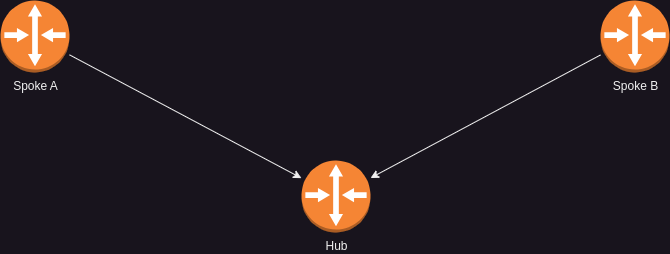
This means, that Spoke A, will be able to access Spoke B, while sending it’s traffic to the Hub, which forwards this to Spoke B
Spoke B will then send its response to this traffic to the Hub which forwards the response to Spoke A
6. Tech Stack⌗
| Site | VPN Device - Hardware | VPN Device - OS | VPN Software |
|---|---|---|---|
| AWS | EC2 Instance t3.micro | MikroTik CHR | MikroTik |
| Pepper | VM | MikroTik CHR | MikroTik |
| Chaeynz | Raspberry Pi 3B+ | Debian 11 | APT Package |
Specification of VPN Software
- MikroTik has it’s own proprietary implementation of the WireGuard protocol, in contrast to the APT package, which uses the official implementation
Since I have never worked with MikroTik I had a very nice learning curve during this project
I have decided to set up the VPN Hub in AWS, simply for the flexibility the cloud provides and the possibility for close and easy integration with cloud resources
For this project we decided to use MikroTik RouterOS / CHR, since it is a very affordable product
The only exception is my Site which is currently running a Debian installation on a Raspberry Pi, where the APT package wireguard was installed
The advantage of MikroTik RouterOS is, that it includes an almost Enterprise-ready product, with fine-grained control over all things networking, as well as a decent firewall
The only exception for being Enterprise-ready in my opinion is the lack of HA
Looking back I found the firewall very confusing, but once you dig into it, it will give you fine-grained control over how the state of a connection is accounted for in firewall policies
It works like iptables, in the way that it has input, output and forward chains.
The firewall is stateful, but requires you to create a policy to accept tracked connections
The VPN protocol being used is solely WireGuard
WireGuard is the fastest VPN protocol compared to the most popular ones IPsec and SSL
Since every Spoke supports WireGuard, we decided to use it everywhere
7. Network design⌗
Setting up my VPN network was a very interesting journey and it included several different technology concepts
Let’s go through my setup step by step
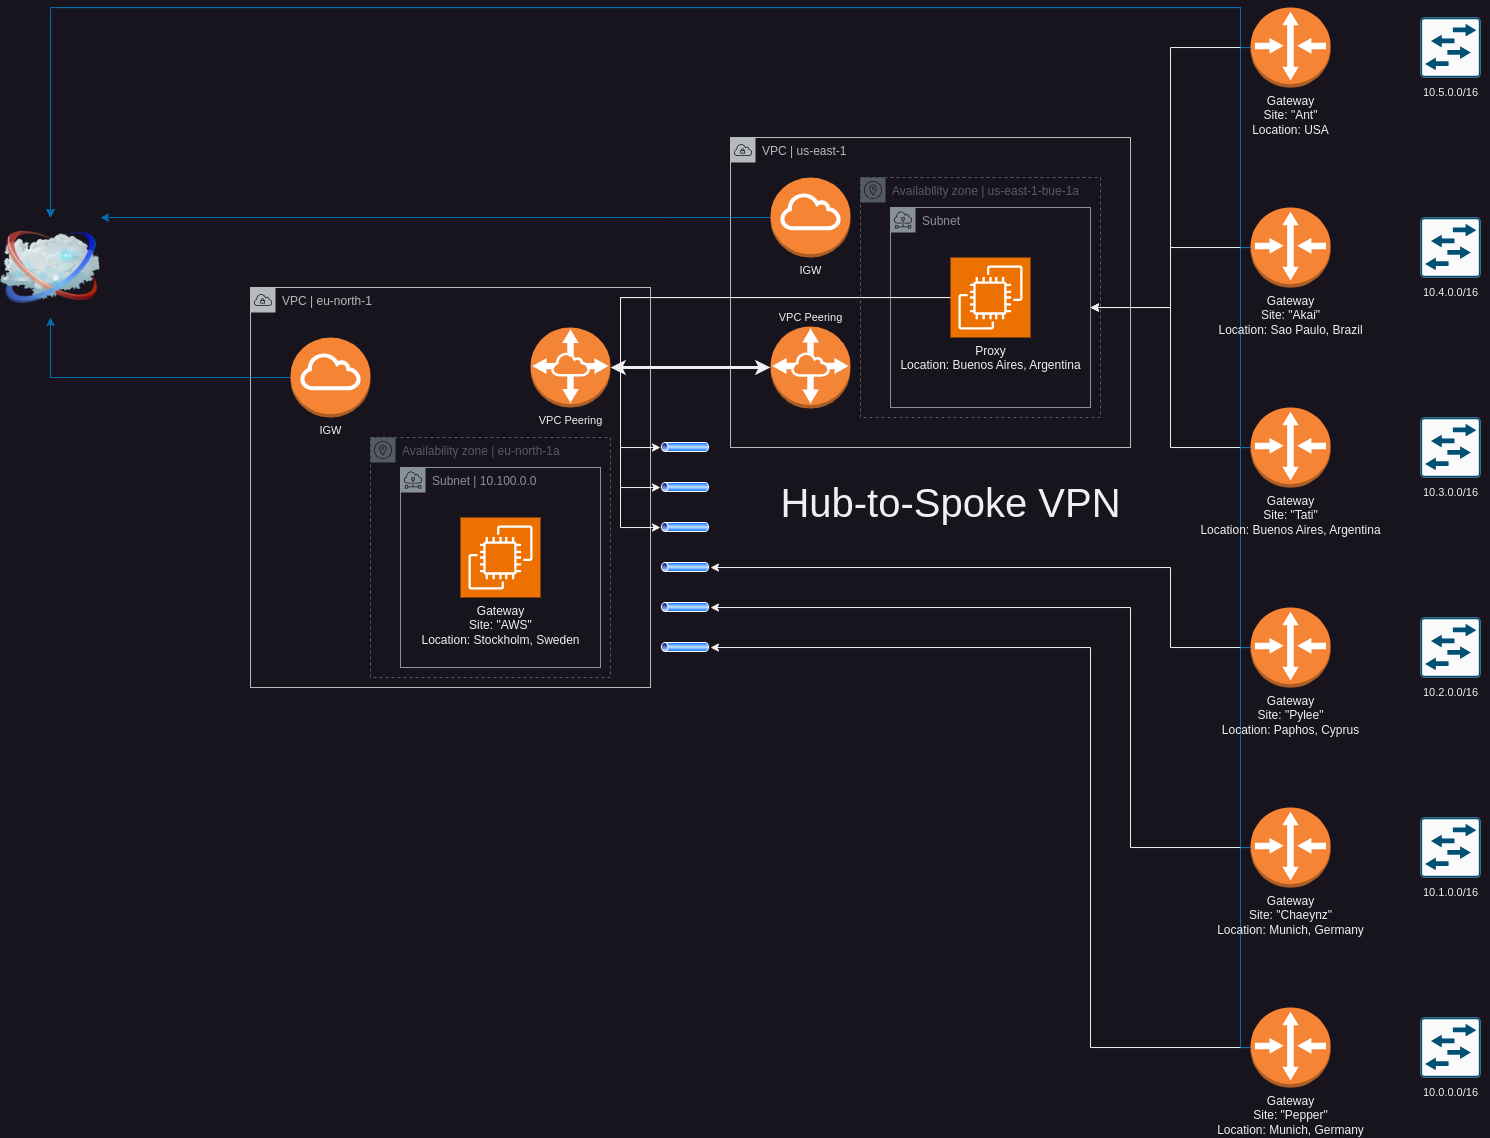
The Gateways are the devices which are going to be responsible for routing the requests to the network on each Site.
Each of the Sites form a Site-to-Site VPN connection to a central VPN hub which is my EC2 instance located in AWS.
In the middle you can see a Proxy set up in AWS, which is going to be used by Sites from the Americas to connect to the VPN for performance reasons.
IP Design
Because I want to isolate each Site-to-Site connection on a network level, I created separate tunnel interfaces and will now define a rather large subnet for use in Point-to-Point connections, utilizing VLSM
Subnet: 172.31.255.0/24
This /24 subnet will then be further subnetted into /31 subnets that I use as Point-to-Point connections
The /31 subnet mask has been defined in RFC 3021 for use in Point-to-Point connections.
Since this saves 50% of my IP address space and honestly just sounds exciting to me, I will use them
I like starting to count from the highest address, so this is how the first connection looks like:
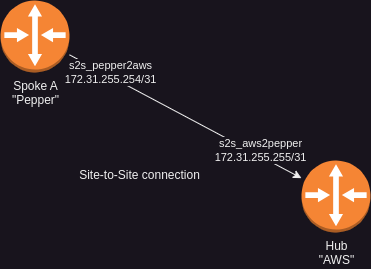
| Site | Interface | IP | Mask |
|---|---|---|---|
| AWS | s2s_aws2pepper | 172.31.255.255 | /31 |
| Pepper | s2s_pepper2aws | 172.31.255.254 | /31 |
The Hub will always be assigned the higher address in each /31 Subnet, while the “connecting” Site, so the Spoke, will use the lower address respectively
Overview
Let me expand this table so that you have a good overview over the entire portion of my network relevant for this post.
| Gateway/Site | Interface | IP | Subnet |
|---|---|---|---|
| AWS | ether1 | 10.100.0.254 | 10.100.0.0/24 |
| AWS | s2s_aws2pepper | 172.31.255.255 | 172.31.255.254/31 |
| AWS | s2s_aws2chaeynz | 172.31.255.253 | 172.31.255.252/31 |
| Pepper | ether1 | 10.0.0.254 | 10.0.0.0/24 |
| Pepper | s2s_pepper2aws | 172.31.255.254 | 172.31.255.254/31 |
| Chaeynz | eth0 | 10.1.0.254 | 10.1.0.0/24 |
| Chaeynz | s2s_chaeynz2aws | 172.31.255.252 | 172.31.255.252/31 |
Optimization
When Sites from the Americas connected to the Hub, the users experienced a significant latency when using resources on the network, since my Hub is located in Stockholm.
I decided to optimize this, by using inter-region VPC Peering connections.
When AWS creates a VPC Peering connection, it will use the infrastructure provided by AWS. This is the reason why connections forwarded by this proxy to the VPC Peering connection will be faster, than using the route over the public internet
It will change the route a device takes to get to its destination
Instead of sending the traffic through thousands of different routers, which might route your traffic over links which suffer congestion, the traffic will be sent basically “next-doors” to the EC2 instance, because it is located in America
8. Configuring WireGuard tunnels and routing⌗
When creating WireGuard tunnels we have to use keypairs for encryption
I will name the keys in these examples, so that they make sense when you see them
Private keys will be lowercase and their corresponding public key will be upper case
In assymetric encryption you have to create one keypair for each participant. In our case this means we will have to two keypairs for each S2S connection
If you want to follow my configuration example, don’t mind the private keys in the MikroTik configs, since RouterOS will generate them automatically for you
Site “AWS”:
/interface/wireguard/
add name=s2s_aws2pepper private-key="aaaaaaaaaaaaaaaaaaaaaaaaaaaaaaaaaaaaaaaaaaa=" listen-port=51820
add name=s2s_aws2chaeynz private-key="ccccccccccccccccccccccccccccccccccccccccccc=" listen-port=51821

/interface/wireguard/peers/
add interface=s2s_aws2pepper public-key="BBBBBBBBBBBBBBBBBBBBBBBBBBBBBBBBBBBBBBBBBBB=" allowed-address=172.31.255.254/32,10.0.0.0/16 endpoint-port=51820 persistent-keepalive=25s
add interface=s2s_aws2chaeynz public-key="DDDDDDDDDDDDDDDDDDDDDDDDDDDDDDDDDDDDDDDDDDD=" allowed-address=172.31.255.252/32,10.1.0.0/16 endpoint-port=51821 persistent-keepalive=25s

/ip/address/
add interface=s2s_aws2pepper address=172.31.255.255/31
add interface=s2s_aws2chaeynz address=172.31.255.253/31

/ip/route/
add dst-address=10.0.0.0/16 gateway=s2s_aws2pepper
add dst-address=10.1.0.0/16 gateway=s2s_aws2chaeynz
Here we can see that AWS has a private key aaa, which also created a public key AAA. I have to copy this public key and enter it on the Site that connects to AWS on this tunnel, in this case Site “Pepper”.
Site “Pepper”:
/interface/wireguard/
add name=s2s_pepper2aws private-key="bbbbbbbbbbbbbbbbbbbbbbbbbbbbbbbbbbbbbbbbbbb=" listen-port=51820

/interface/wireguard/peers/
add interface=s2s_pepper2aws public-key="AAAAAAAAAAAAAAAAAAAAAAAAAAAAAAAAAAAAAAAAAAA=" allowed-address=172.31.255.255/32,10.100.0.0/16,10.1.0.0/16 endpoint-address=elasticip.aws.instance endpoint-port=51820

/ip/address/
add interface=s2s_pepper2aws address=172.31.255.254/31

/ip/route/
add dst-address=10.1.0.0/16 gateway=s2s_pepper2aws
add dst-address=10.100.0.0/16 gateway=s2s_pepper2aws
On Site “Pepper” you can see the private key bbb. I already added the corresponding BBB public key on AWS, as seen in Site “Pepper” and the connection will work as expected:
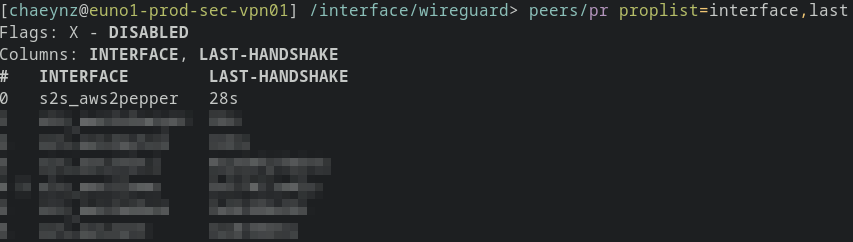
Successful handshake between “AWS” and “Pepper”
Moving on to the Site “Chaeynz”, which is my home network. It will use the WireGuard apt package, as beforementioned
Site “Chaeynz”:
# s2s_chaeynz2aws.conf
[Interface]
Address = 172.31.255.252/31
ListenPort = 51821
PrivateKey = ddddddddddddddddddddddddddddddddddddddddddd=

[Peer]
PublicKey = CCCCCCCCCCCCCCCCCCCCCCCCCCCCCCCCCCCCCCCCCCC=
AllowedIPs = 172.31.255.253/32, 10.0.0.0/16, 10.100.0.0/16
Endpoint = elasticip.aws.instance:51821
PersistentKeepalive = 25
The configuration looks a little bit different, but it will not contain any information that is different on MikroTik devices
The Address directly specifies the IP address that is going to be assigned to the locally created tunnel interface when the WireGuard tunnel is created
The PrivateKey is ddd, whose corresponding public key DDD we already defined in the config of the AWS instance
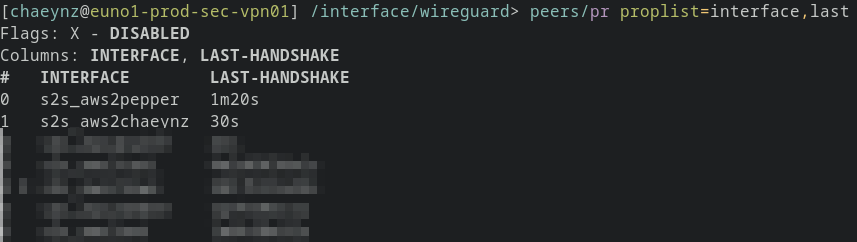
Successful handshake between “AWS” and “Chaeynz”
After configuring this we have set up everything necessary to officially call it a Hub-to-Spoke VPN

9. AllowedIPs in WireGuard⌗
Let’s take a step back here
I have not yet talked about the AllowedIPs that I am specifying.
They were a very unique concept to me that I have not yet seen in other VPN protocols and I want to explain in depth how they work, according to the WireGuard Whitepaper.
You first have to understand, that you need to configure a “Peer”, in which you enforce a set of Keypairs to be used (using the Public Key you define, that is associated with devices that connect AND the private key you defined in the interface whose associated public key must be known be the devices that connect).
Finally you will need to configure the IPs that are allowed from those Peers
I can sum it up in a single sentence: Define the IPs that you expect to send traffic to AND receive traffic from, on the other side of the tunnel.
Why?
When you receive incoming traffic ON a tunnel interface FROM a Peer, it must first be DECRYPTED. That is important to remember.
WireGuard will check after each time when a packet is decrypted, if the source IP is defined in AllowedIPs and will drop the packet if the IP is not specified.
10. Configuring domain records in Route 53 for Geolocation Routing⌗
In AWS we can register and rent domains in Route 53.
As the name suggests, it is not merely for creating a domain, but also integrates perfectly for routing traffic dynamically to your AWS resources.
In the case of EC2 we have to define the target (“Value/Route traffic to”) as an IP. This should be an Elastic IP
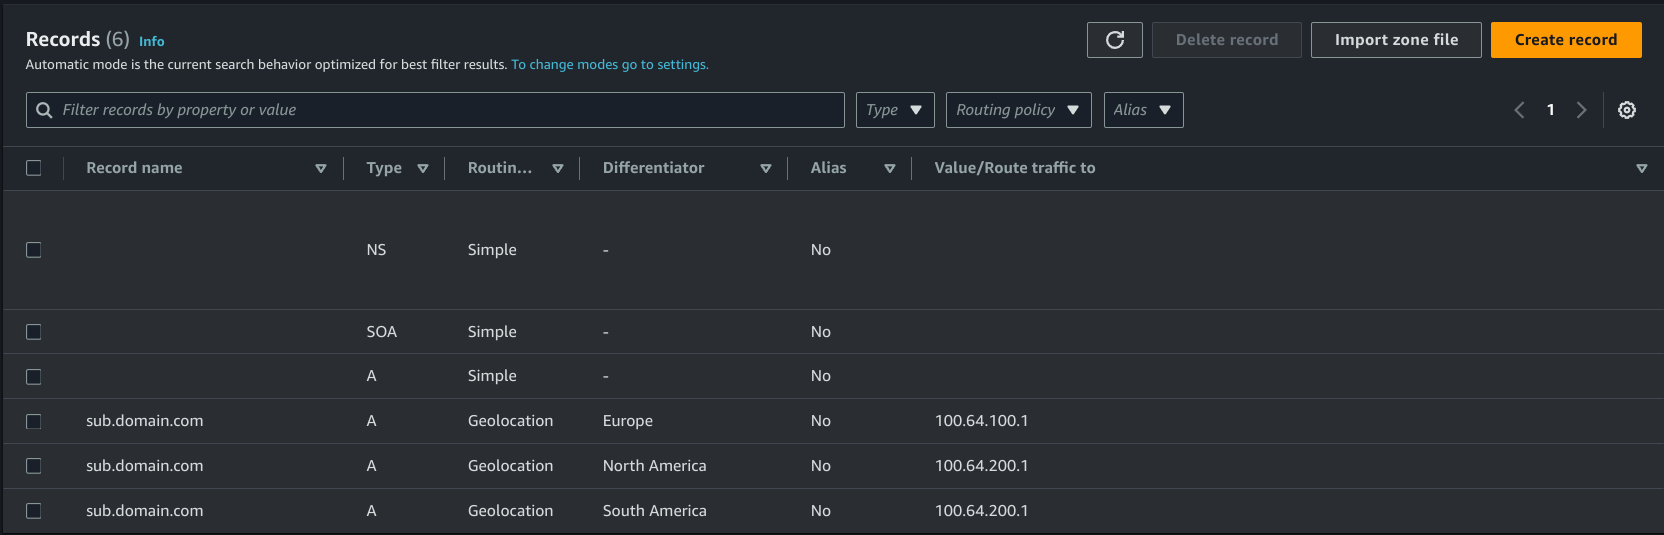
Here you can see how DNS requests on my domain will be routed selectively by Geolocation to different IPs.
Clients from South America and North America will resolve the domain name to100.64.200.1, while clients (Spokes) from Europe will resolve the domain name to100.64.100.1
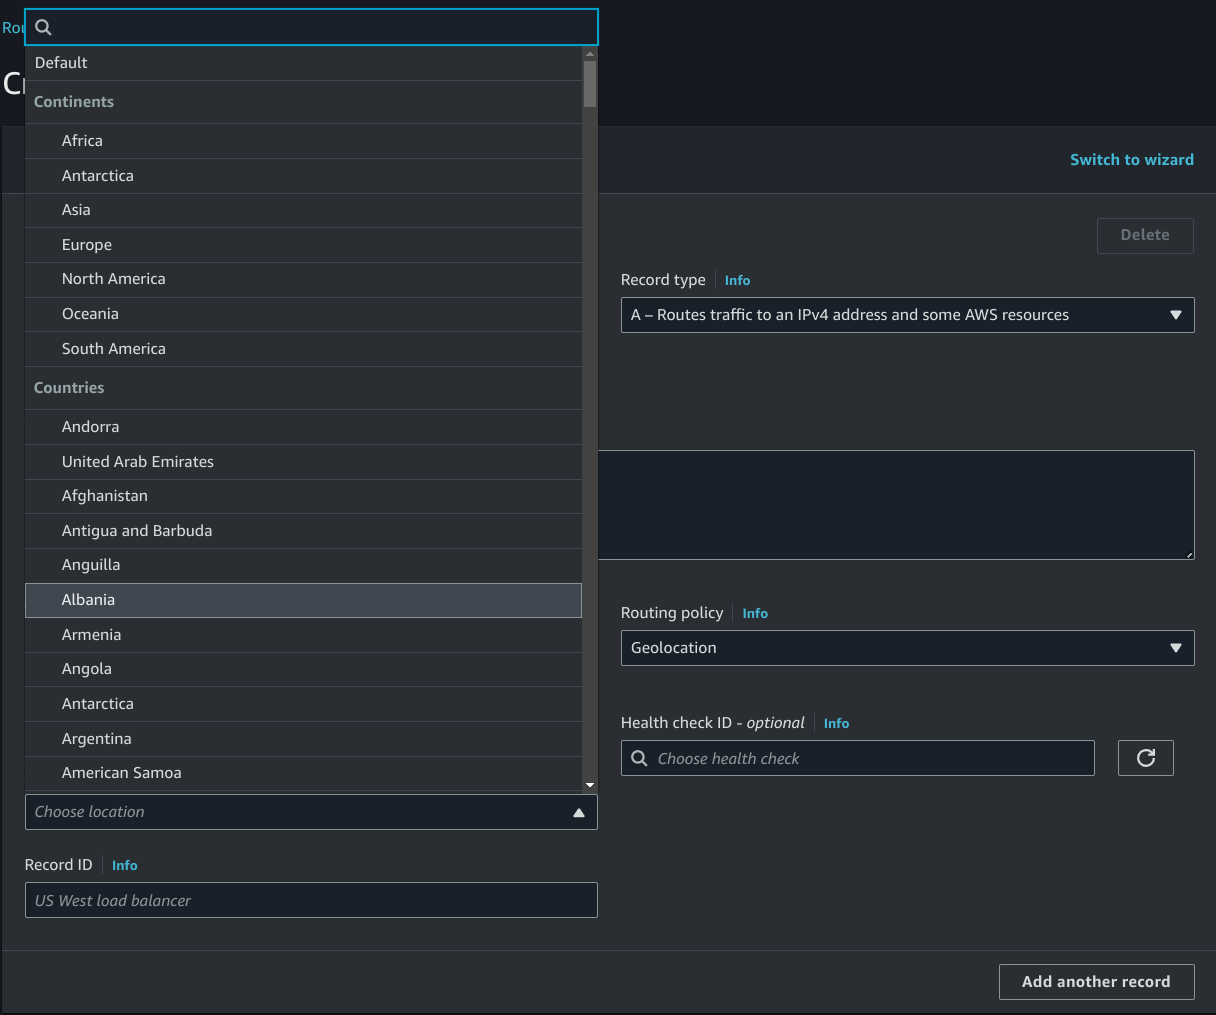
We can implement Geolocation Routing by selecting the region, where we expect the clients (Spokes) IPs to come from and define the resolved IP address in the record value. Then repeat this process for each location you want to uniquely route
100.64.100.1 will be my actual VPN Hub, which is located in Stockholm, while 100.64.200.1 is the proxy that is located in Argentina, Buenos Aires (us-east-bue-1a)
Once the domain is set up, we know that our EC2 instance acting as proxy will receive traffic on it’s public facing interface.
The clients (Spokes) will not notice this, since they are using our domain to connect to the central hub and after it is resolved they will just initiate the connection to a different
11. Creating a VPC Peering connection⌗
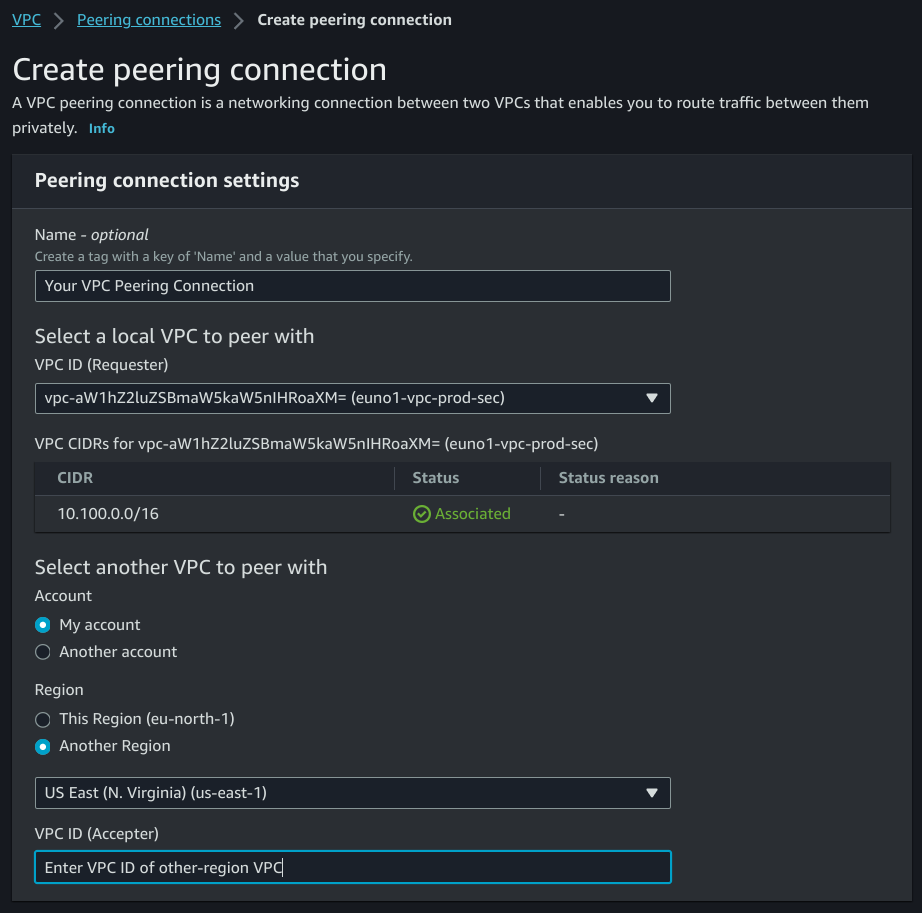
This is fairly easy. You have to request a VPC Peering connection from one VPC to the other VPC, by specifying the VPC ID
Notice the “Another Region” radio button
From the “Accepter” VPC, you will have to accept the request and you’re done
12. Configuring the proxy⌗
As proxy software I used ad hoc socat. It perfectly suits the job, since I have to manage two bidirectional bytestreams, from the client (Spoke) to the proxy and from the proxy to the VPN Hub
This can be achieved in socat by specifying a listener and a fork
socat UDP4-LISTEN:51820,fork UDP4:10.100.0.254:51820
Socat will now forward incoming UDP traffic on port 51820 to the VPN Server over the VPC Peering connection
Amazingly enough this decreased the latency of a user based in South America from 220ms to 120ms
Keep in mind: The Hub is based in Stockholm!
13. Conclusion⌗
WireGuard is a lovely VPN protocol which provides you with enterprise-grade security at exceptional speeds
About my subnetting decisions I need to mention, that using /31 is definetely not the only way to go and I would not recommend it in every environment, since this might cause troubles
Specifically with MikroTik I have noticed that their bandwidth-test tool does not work as intended and I had to manually configure routes with preferred source IPs to get the tool bind to a different IP address
Optimizing the network performance through the use of a VPC Peering connection was an idea that just came to my mind
I talked with p3nnyW about it, showed it on a DrawIO diagram and we agreed that this will most probably work. After configuring it, I was amazed by the results
Other than that I found MikroTik very interesting to work with
MikroTik RouterOS is based on linux and I felt very much at home when using the CLI
Comparably the use of commands through autocompletion also felt like my experience with Cisco devices
I would highly recommend checking MikroTik out
14. Glossary⌗
| Term | Definition |
|---|---|
| RouterOS | MikroTik’s OS for Routers |
| VM | Virtual Machine |
| CHR | MikroTik Cloud Hosted Router, a version of RouterOS refined for deployments in VMs |
| AWS | Amazon Web Services |
| EC2 | Elastic Compute Cloud - AWS service for hosting cloud resources |
| VPC | Virtual Private Cloud - A secure, isolated private cloud hosted within a public cloud, also the exact name for the AWS service to deploy VPCs |
| VPC Peering | Connect two different VPCs without an extra hop |
| IGW | Internet Gateway in an AWS VPC |
| Route 53 | DNS service for renting and managing domains on AWS |
| SIEM | Centralized security information and event management |
| VLSM | Variable Length Subnet Mask |
15. Document History:⌗
| Date | Version | Public? | Comment |
|---|---|---|---|
| 2023-11-07 | v1 | No | |
| 2023-12-09 | v2 | Yes | Release |
16. Sources:⌗
- https://docs.netgate.com/pfsense/en/latest/recipes/wireguard-s2ms.html
- https://aws.amazon.com/blogs/aws/new-almost-inter-region-vpc-peering/
- https://datatracker.ietf.org/doc/html/rfc3021
- https://www.wireguard.com/papers/wireguard.pdf
- https://docs.aws.amazon.com/AWSEC2/latest/UserGuide/elastic-ip-addresses-eip.html
- https://help.mikrotik.com/docs/display/ROS/WireGuard
- https://help.mikrotik.com/docs/display/ROS/Basic+Concepts
17. Special thanks:⌗
- lordkitsuna | grep ‘Feedback & Troubleshooting’
- CommanderKronos | grep ‘Feedback’
- p3nnyW | grep ‘Feedback”
- Keo | grep ‘Feedback’
- bat | grep ‘QXF1YV9zYWx1dGVfRkI=’
- Tati | grep ‘Mate’
- pylee | grep '’
@TeamViewer no front btw
EOF