Exploring full-tunnel VPN with the Mullvad Client
1. Table of Contents⌗
- Table of Contents
- Introduction
- Virtual Tunnel Interface
- Policy-based routing
- Routing table with Mullvad
- Routing the traffic correctly
- Conclusion
- Sources
2. Introduction⌗
Hey!
After exploring many different tunneling protocols, I learned how simple they work for an administrator (not IPsec ofc) and how easy it is to set up Site-to-Site connections.
But what about popular VPN clients, like Mullvad? They use a full-tunnel, so that all your internet connections are sent through the tunnel.
Let’s dive into how a full-tunnel works
3. Virtual Tunnel Interface⌗
A virtual tunnel interface (VTI), is, as the name suggests, a virtual interface. It acts as an interface to a software, like the mullvad client, and doesn’t let you send traffic directly on a wire.
This type of network interface will allow us to send traffic into the Mullvad VPN client software, which will then perform it’s typical operations, like encrypting and properly sending it to the Mullvad Servers.
We have a problem here, as after we have this interface, our kernel will not know by itself, that traffic is supposed to go there. And in case we manually add a default route using this interface, it would basically end up in a loop and not know how to reach the Mullvad Servers. But those are supposed to forward our traffic!
Here I explore the solution that Mullvad found for this..
4. Policy-based routing⌗
The Linux kernel uses policy-based routing to handle routing decisions based on certain criteria beyond traditional destination IP address and subnet masks.
When activating the Mullvad VPN we are adding another routing table.
The linux kernel can then be told, to lookup our Mullvad VPN routing table if it matches specific criteria, for instance, a firewall mark.
‘fwmark’ is used to tag packets with a specific identifier within the Linux kernel’s networking stack. That means it is only inside of the software that handles networking in linux. It DOES NOT modify the traffic that is sent on the wire.
5. Routing Table with Mullvad⌗
Our goal is now to make Mullvad work with policy based routing. We already discussed, that it will add a new routing table. Let’s look at the changes

We still have to send our packets after encrypting to the Mullvad VPN server, which is why we don’t change the default route.
Default table / default route:
default via 10.55.255.254 dev enp5s0 proto dhcp src 10.55.0.12 metric 100
Breaking it down:
default is an alias for 0.0.0.0/0
This is a destination address, so all traffic that matches this destination address, can use this route. In this case it means “any” destination
via 10.55.255.254 means, “send your traffic towards this person”. In this case this is my home router
dev enp5s0 tells the kernel, that we find the gateway on this Ethernet interface
proto dhcp we acquired this route from our DHCP server
src 10.55.0.12 our IP on this interface is 10.55.0.12, if we send traffic over this route, this is the packets Source IP address
metric 100 metric can be used to prefer one route over the other, in case of multiple routes. We only have one in this case.
Mullvad table / default route:
default dev wg-mullvad table 1836018789 proto static
Breaking it down again:
default = 0.0.0.0/0
dev wg-mullvad can also be used as “Gateway”, we just send it out of the interface and hope the other end handles it accordingly
table 1836018789 this route is put specifically on this table, the table where we will later tell linux to look into for all internet traffic
proto static this was added statically by a user, or a software, in this case the Mullvad client
You might be wondering, if we just send it out on the interface, how does it know the MAC address of the gateway?? Which address will it put as destination on the Ethernet frame??
Well, as WireGuard is encapsulating Layer 3 traffic only, it does not send any ethernet frame in the tunnel.
We can see this when starting a capture with WireShark, selecting the wg0-mullvad interface.

There is no Ethernet Frame. The Mullvad VPN Servers will just forward your traffic and forward the reply to you. For our linux kernel it looks like you are directly connected to the internet, like, oh “everything is directly connected on this interface, great”
6. Routing the traffic correctly⌗
As expected, our goal is now to tell our linux kernel, to route all traffic over the Mullvad VPN routing table
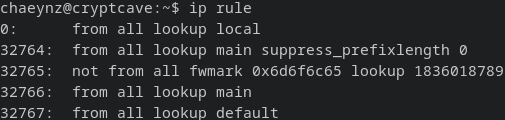
We are using IP rules for this.
32764: from all lookup main suppress_prefixlength 0
The first interesting rule is 32764, which specifies to lookup the main routing table, but suppress if the applicable route has a prefix length of 0.
The only route with a prefix length of 0 is the default route
Therefore all packes that would take the default route will be suppressed
This enables us to send traffic to our local LAN, while still using the Mullvad VPN for the internet. If you remember the screenshot of our routing table, we had one route 10.55.0.0/16, which tells the kernel “this subnet is directly attached to your interface”.
SoooOo aKsHuAlLy 🤓 iT isN’t ReAlLy a fUlL-TuNneL 🤓
Side-info: This route 10.55.0.0/16 is also necessary to locate the default gateway, as otherwise it wouldn’t know where to find 10.55.255.254 in the default route.
32765: not from all fwmark 0x6d6f6c65 lookup 1836018789
This will lookup the routing table 1836018789 for all packets EXCEPT packets marked with 0x6d6f6c65
0x6d6f6c65 is the mark that the Mullvad Client Software assigns to packets that are destined for the Mullvad VPN server that you are connecting to
Mullvad always uses this mark.
7. Conclusion⌗
In summary, we are keeping the original routing table, adding a rule to lookup the Mullvad Routing table by default, unless the traffic has a specific fwmark.
The Mullvad client marks all traffic towards its VPN servers with this mark. That traffic will then be sent over your normal default gateway.
That way all traffic will enter the virtual tunnel interface, which is then handled by the Mullvad VPN software: Encrypt, append a second IP header, set the headers destination IP to Mullvad VPN Server, put fwmark on it, send out to the Linux kernels network stack again.
8. Sources:⌗
https://ro-che.info/articles/2021-02-27-linux-routing https://stbuehler.de/blog/article/2020/02/29/using_vrf__virtual_routing_and_forwarding__on_linux.html